一:背景
1. 讲故事
本篇是系列的最后一篇,我们从跨平台部署和自定义诊断的角度跟大家聊一聊 dottrace,希望对大家有所启发。
二:跨平台和自定义诊断
1. 如何跨平台诊断分析
如果 dottrace 只能在 windows 平台上跑,那确实不值得写一个系列,目前它可以横跨三大平台(Windows,Linux,Mac),这里就用 ubuntu 来给大家演示下,参考代码如下:- public class TimeConsumingMethodExample
- {
- public static void Main()
- {
- Console.WriteLine("开始执行耗时方法...");
- // 调用耗时方法
- PerformTimeConsumingTask(3000);
- Console.WriteLine("耗时方法执行完成!");
- }
- /// <summary>
- /// 模拟一个耗时方法
- /// </summary>
- /// <param name="milliseconds">要模拟的耗时(毫秒)</param>
- public static void PerformTimeConsumingTask(int milliseconds)
- {
- Stopwatch stopwatch = Stopwatch.StartNew();
- // 模拟耗时操作 - 这里使用Thread.Sleep
- Thread.Sleep(milliseconds);
- stopwatch.Stop();
- Console.WriteLine($"方法执行耗时: {stopwatch.ElapsedMilliseconds} 毫秒");
- }
- }
- root@ubuntu2404:/data2/code# ls -lh
- total 100K
- -rw-r--r-- 1 root root 71K Jun 30 09:01 ConsoleApp7
- -rw-r--r-- 1 root root 482 Jun 30 09:01 ConsoleApp7.deps.json
- -rw-r--r-- 1 root root 4.5K Jun 30 09:01 ConsoleApp7.dll
- -rw-r--r-- 1 root root 12K Jun 30 09:01 ConsoleApp7.pdb
- -rw-r--r-- 1 root root 268 Jun 30 09:01 ConsoleApp7.runtimeconfig.json
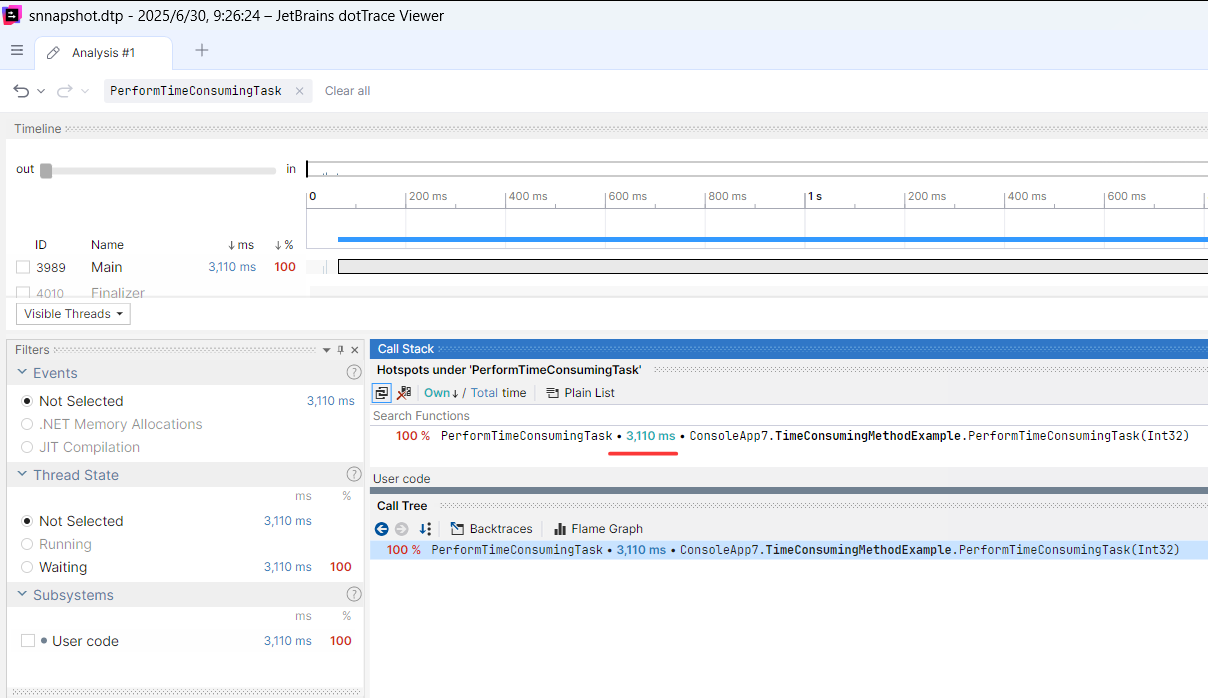
可以通过官方链接: https://www.jetbrains.com/profiler/download/?section=commandline 下载 linux 的 tar 包,然后本地解压,开启 timeline 跟踪模式,参考如下:- root@ubuntu2404:/data2/dottrace# tar -xzxf JetBrains.dotTrace.CommandLineTools.linux-x64.2025.1.3.tar.gz
- root@ubuntu2404:/data2/dottrace# ./dottrace start --profiling-type=Timeline --framework=NetCore /usr/bin/dotnet /data2/code/ConsoleApp7.dll --save-to=/data2/output/snnapshot.dtp
- dotTrace command-line profiler 2025.1.3 build 777.0.20250604.2353. Copyright (C) 2025 JetBrains s.r.o.
- Preparing to profile...
- Profiling in progress...
- 开始执行耗时方法...
- 方法执行耗时: 3000 毫秒
- 耗时方法执行完成!
- Profiling is finished in 5.523 seconds
- Collected snapshot: /data2/output/snnapshot.dtp
- root@ubuntu2404:/data2/output# tar -czvf dottrace_snapshot.tar.gz snnapshot.dtp*
- snnapshot.dtp
- snnapshot.dtp.0000
- snnapshot.dtp.0001
- snnapshot.dtp.0002
- snnapshot.dtp.0003
- snnapshot.dtp.0004
- snnapshot.dtp.0005
- snnapshot.dtp.0006
- snnapshot.dtp.0007
- ...
- root@ubuntu2404:/data2/output# sz dottrace_snapshot.tar.gz

如果使用源码方式有这样或者那样的问题,可以使用此种方式,它会将 command-line 工具集成到了 dotnet cli 中,参考如下:- root@ubuntu2404:/data2/dottrace# dotnet tool install --global JetBrains.dotTrace.GlobalTools
- Skipping NuGet package signature verification.
- You can invoke the tool using the following command: dottrace
- Tool 'jetbrains.dottrace.globaltools' (version '2025.1.3') was successfully installed.
- root@ubuntu2404:/data2/dottrace# cd ..
- root@ubuntu2404:/data2# dottrace start --profiling-type=Timeline --framework=NetCore --save-to=/data2/output/snnapshot.dtp /usr/bin/dotnet /data2/code/ConsoleApp7.dll
- dotTrace command-line profiler 2025.1.3 build 777.0.20250604.2353. Copyright (C) 2025 JetBrains s.r.o.
- Preparing to profile...
- Profiling in progress...
- 开始执行耗时方法...
- 方法执行耗时: 3000 毫秒
- 耗时方法执行完成!
- Profiling is finished in 5.65 seconds
- Collected snapshot: /data2/output/snnapshot.dtp
2. 如何自定义诊断分析
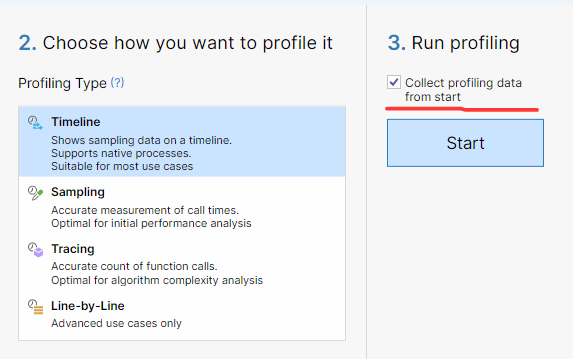
很多朋友应该知道dottrace默认的诊断方式为全局跟踪,即启动后跟踪,截图如下:

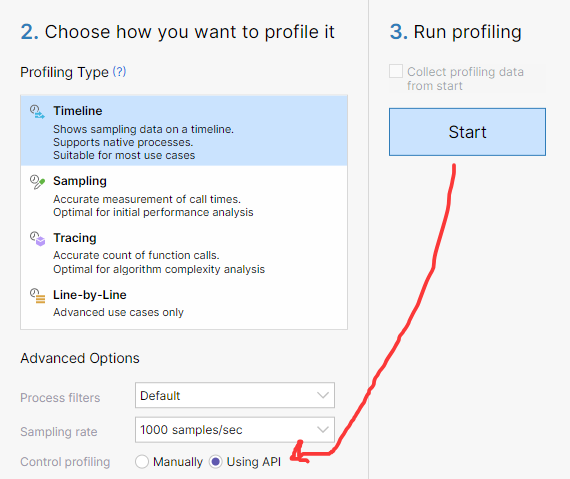
但这种跟踪方式会掺杂很多噪音,除了让跟踪文件变大,也不利于我们过滤分析,所以就有了一个需求,如何指定 作用域 分析?比如我只想分析某一个方法,厉害的是 dottrace 还真可以做到,在 nuget 上引用 JetBrains.Profiler.Api 包,然后用 MeasureProfiler.StartCollectingData() 和 MeasureProfiler.SaveData(); 将分析的范围圈一下即可,参考代码如下:- class Program
- {
- static void Main()
- {
- // 创建并启动Stopwatch
- Stopwatch stopwatch = new Stopwatch();
- stopwatch.Start();
- string filePath = @"D:\1GB_LogFile.log";
- DoRequest(filePath);
- // 停止并显示总耗时
- stopwatch.Stop();
- Console.WriteLine($"总耗时: {stopwatch.Elapsed.TotalSeconds:F2}秒");
- }
- static void DoRequest(string filePath)
- {
- CheckParameter();
- const int chunkSize = 512 * 1024 * 1024; // 每次读取512MB
- try
- {
- Console.WriteLine("开始分块读取文件...");
- int chunkCount = 0;
- long totalBytesRead = 0;
- MeasureProfiler.StartCollectingData();
- using (var fileStream = new FileStream(filePath, FileMode.Open, FileAccess.Read, FileShare.Read))
- {
- byte[] buffer = new byte[chunkSize];
- int bytesRead;
- while ((bytesRead = fileStream.Read(buffer, 0, buffer.Length)) > 0)
- {
- totalBytesRead += bytesRead;
- chunkCount++;
- // 处理当前块的数据
- string chunkContent = Encoding.UTF8.GetString(buffer, 0, bytesRead);
- Console.WriteLine($"读取块 {chunkCount}, 大小: {bytesRead / 1024}KB, 总计: {totalBytesRead / 1024 / 1024}MB");
- }
- }
- MeasureProfiler.SaveData();
- Console.WriteLine($"文件读取完成,共 {chunkCount} 块");
- }
- catch (Exception ex)
- {
- Console.WriteLine($"出错: {ex.Message}");
- }
- }
- static void CheckParameter()
- {
- Console.WriteLine("检查参数开始...");
- Thread.Sleep(5000);
- Console.WriteLine("检查参数结束...");
- }
- }

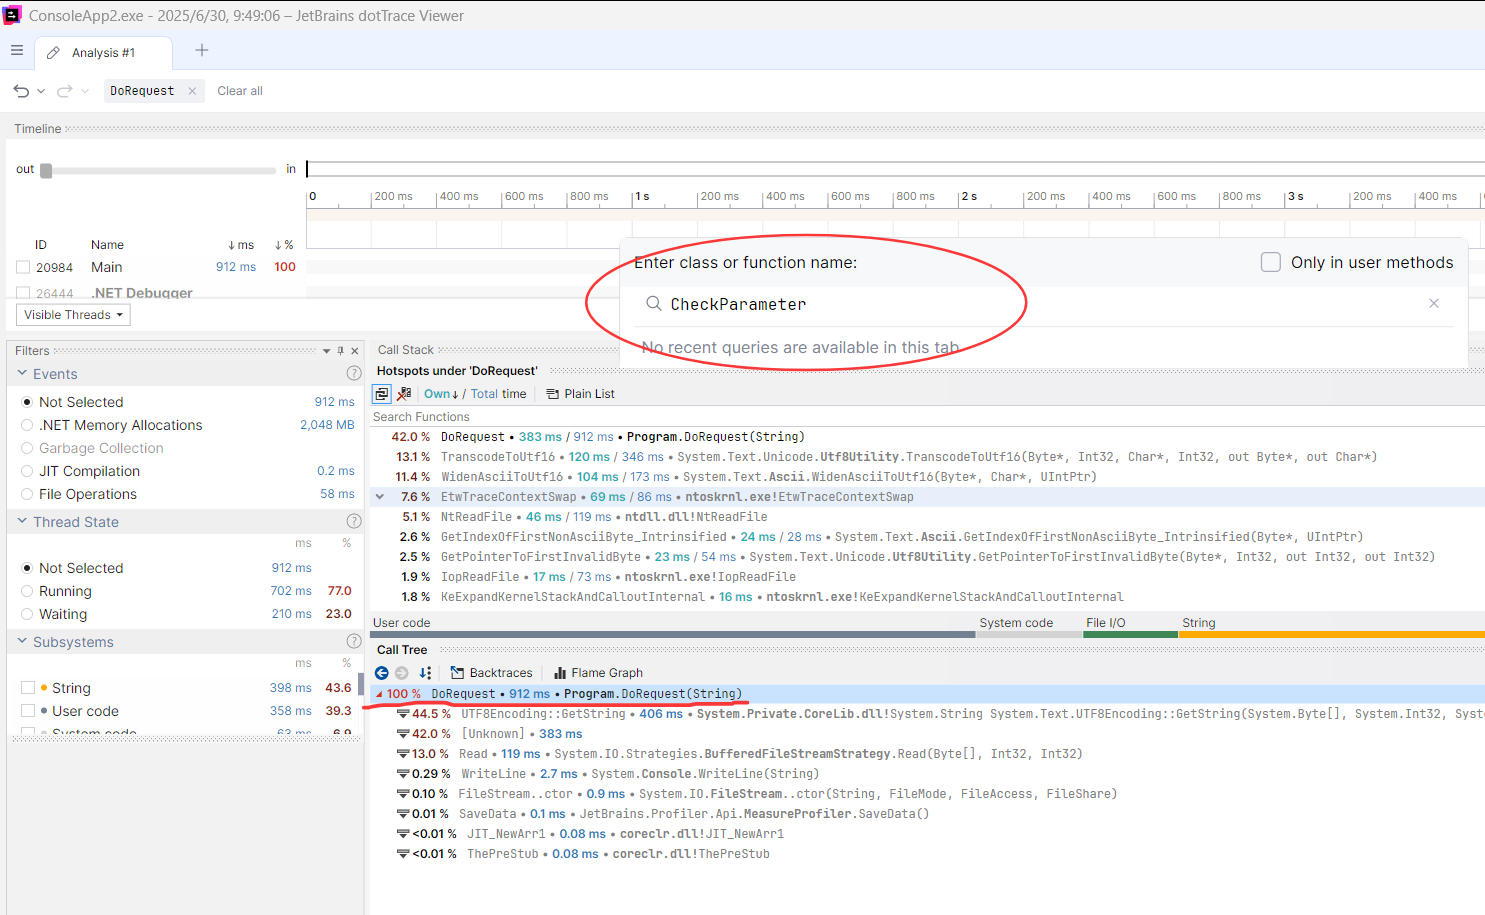
跟踪完成之后打开跟踪文件,发现 CheckParameter() 方法不在其中,同时也详细的记录了 DoRequest 下的 fileStream 耗时详情,是不是挺有意思,截图如下:

三:总结
本系列总共9篇,本想着写10篇凑个十全十美,但天残地缺,天聋地哑,才是一个人最好的状态,终归小满胜万全呀!
作为JetBrains社区内容合作者,如有购买jetbrains的产品,可以用我的折扣码 HUANGXINCHENG,有25%的内部优惠哦。
来源:程序园用户自行投稿发布,如果侵权,请联系站长删除
免责声明:如果侵犯了您的权益,请联系站长,我们会及时删除侵权内容,谢谢合作! |