大家好,我是潘Sir,持续分享IT技术,帮你少走弯路。《鸿蒙应用开发从入门到项目实战》系列文章持续更新中,陆续更新AI+编程、企业级项目实战等原创内容、欢迎关注!
ArkUI提供了各种布局组件用于界面布局,本文研究使用Flex组件实现弹性布局。
一、概述
弹性布局(Flex)的效果类似于线性布局(Column/Row),也会使子元素呈线性排列,但是弹性布局在子元素的排列、对齐和剩余空间的分配等方面更加灵活。
二、参数
Flex组件的参数定义如下,下面逐一介绍每个属性- Flex(value?: { direction?: FlexDirection, justifyContent?: FlexAlign, alignItems?: ItemAlign, wrap?: FlexWrap, alignContent?: FlexAlign })
direction用于设置Flex容器的布局方向,即子元素的排列方向,其类型FlexDirection为枚举类型,可选的枚举值如下
示例代码
pages/component/layout目录下新建flex目录,新建DirectionPage.ets文件- @Entry
- @Component
- struct DirectionPage {
- build() {
- Column({ space: 50 }) {
- Flex({ direction: FlexDirection.ColumnReverse }) {
- Text('1')
- .width(100)
- .height(100)
- .itemTextStyle4()
- Text('2')
- .width(100)
- .height(100)
- .itemTextStyle4()
- Text('3')
- .width(100)
- .height(100)
- .itemTextStyle4()
- }
- .height(350)
- .width(350)
- .flexStyle4()
- }.width('100%')
- .height('100%')
- .justifyContent(FlexAlign.Center)
- }
- }
- @Extend(Text) function itemTextStyle4() {
- .textAlign(TextAlign.Center)
- .fontColor(Color.White)
- .fontSize(40)
- .fontWeight(FontWeight.Bold)
- .backgroundColor('#008a00')
- .borderWidth(1)
- }
- @Extend(Flex) function flexStyle4() {
- .backgroundColor('#f5f5f5')
- .borderWidth(1)
- }
2.2 主轴排列方式(justifyContent)
justifyContent参数的作用同Column/Row容器的justifyContent()完全相同,也是用于设置子元素在主轴方向的排列方式,其类型同样为FlexAlign,可选的枚举值如下
示例代码
pages/component/layout/flex目录,新建JustifyContentPage.ets文件- @Entry
- @Component
- struct JustifyContentPage {
- build() {
- Column({ space: 50 }) {
- Flex({
- direction: FlexDirection.Row,
- justifyContent: FlexAlign.Start
- }) {
- Text('1')
- .width(50)
- .height(50)
- .itemTextStyle5()
- Text('2')
- .width(50)
- .height(50)
- .itemTextStyle5()
- Text('3')
- .width(50)
- .height(50)
- .itemTextStyle5()
- }.height(50)
- .width(300)
- .flexStyle5()
- }.width('100%')
- .height('100%')
- .justifyContent(FlexAlign.Center)
- }
- }
- @Extend(Text) function itemTextStyle5() {
- .textAlign(TextAlign.Center)
- .fontColor(Color.White)
- .fontSize(40)
- .fontWeight(FontWeight.Bold)
- .backgroundColor('#008a00')
- .borderWidth(1)
- }
- @Extend(Flex) function flexStyle5() {
- .backgroundColor('#f5f5f5')
- .borderWidth(1)
- }
alignItems参数的作用同Column/Row容器的alignItems()相同,也是用于设置子元素在交叉轴的对齐方式。但该参数的类型与Column/Row容器的alignItems()方法不同,为ItemAlign,可选的枚举值有
示例代码
pages/component/layout/flex目录,新建AlignItemsFlexPage.ets文件- @Entry
- @Component
- struct AlignItemsFlexPage {
- build() {
- Column({ space: 50 }) {
- Flex({
- direction: FlexDirection.Row,
- alignItems: ItemAlign.Baseline
- }) {
- Text('Beyond')
- .width(100)
- .height(100)
- .itemTextStyle6()
- Text('章')
- .width(100)
- .height(200)
- .itemTextStyle6()
- Text('章')
- .width(100)
- .height(150)
- .itemTextStyle6()
- }.height(350)
- .width(350)
- .flexStyle6()
- }.width('100%')
- .height('100%')
- .justifyContent(FlexAlign.Center)
- }
- }
- @Extend(Text) function itemTextStyle6() {
- .textAlign(TextAlign.Center)
- .fontColor(Color.White)
- .fontSize(40)
- .fontWeight(FontWeight.Bold)
- .backgroundColor('#008a00')
- .borderWidth(1)
- }
- @Extend(Flex) function flexStyle6() {
- .backgroundColor('#f5f5f5')
- .borderWidth(1)
- }
默认情况下,Flex容器的子组件,都排在一条线(主轴)上。当子组件在主轴方向的尺寸之和大于Flex容器时,为适应容器尺寸,所有子组件的尺寸都会自动收缩。如果需要保持子组件的尺寸不收缩,也可选择令子组件换行(列)显示。
wrap属性的作用就是控制如何换行,该属性的类型FlexWrap为枚举类型,可选的枚举值如下
示例代码
pages/component/layout/flex目录,新建WrapPage.ets文件- @Entry
- @Component
- struct WrapPage {
- build() {
- Column({ space: 50 }) {
- Flex({
- direction: FlexDirection.Row,
- wrap: FlexWrap.WrapReverse
- }) {
- Text('1')
- .width(100)
- .height(100)
- .itemTextStyle7()
- Text('2')
- .width(100)
- .height(100)
- .itemTextStyle7()
- Text('3')
- .width(100)
- .height(100)
- .itemTextStyle7()
- Text('4')
- .width(100)
- .height(100)
- .itemTextStyle7()
- Text('5')
- .width(100)
- .height(100)
- .itemTextStyle7()
- Text('6')
- .width(100)
- .height(100)
- .itemTextStyle7()
- }.height(350)
- .width(350)
- .flexStyle7()
- }.width('100%')
- .height('100%')
- .justifyContent(FlexAlign.Center)
- }
- }
- @Extend(Text) function itemTextStyle7() {
- .textAlign(TextAlign.Center)
- .fontColor(Color.White)
- .fontSize(40)
- .fontWeight(FontWeight.Bold)
- .backgroundColor('#008a00')
- .borderWidth(1)
- }
- @Extend(Flex) function flexStyle7() {
- .backgroundColor('#f5f5f5')
- .borderWidth(1)
- }
当Flex容器中包含多行(列)时,可使用alignContent设置多行在交叉轴的排列方式,该属性的类型为FlexAlign,可选的枚举值如下
示例代码
pages/component/layout/flex目录,新建AlignContentPage.ets文件- @Entry
- @Component
- struct AlignContentPage {
- build() {
- Column({ space: 50 }) {
- Flex({
- direction: FlexDirection.Row,
- wrap: FlexWrap.Wrap,
- alignContent: FlexAlign.SpaceAround,
- }) {
- Text('1')
- .width(100)
- .height(100)
- .itemTextStyle8()
- Text('2')
- .width(100)
- .height(100)
- .itemTextStyle8()
- Text('3')
- .width(100)
- .height(100)
- .itemTextStyle8()
- Text('4')
- .width(100)
- .height(100)
- .itemTextStyle8()
- Text('5')
- .width(100)
- .height(100)
- .itemTextStyle8()
- Text('6')
- .width(100)
- .height(100)
- .itemTextStyle8()
- }.height(350)
- .width(350)
- .flexStyle8()
- }.width('100%')
- .height('100%')
- .justifyContent(FlexAlign.Center)
- }
- }
- @Extend(Text) function itemTextStyle8() {
- .textAlign(TextAlign.Center)
- .fontColor(Color.White)
- .fontSize(40)
- .fontWeight(FontWeight.Bold)
- .backgroundColor('#008a00')
- .borderWidth(1)
- }
- @Extend(Flex) function flexStyle8() {
- .backgroundColor('#f5f5f5')
- .borderWidth(1)
- }
3.1 交叉轴对齐(alignSelf)
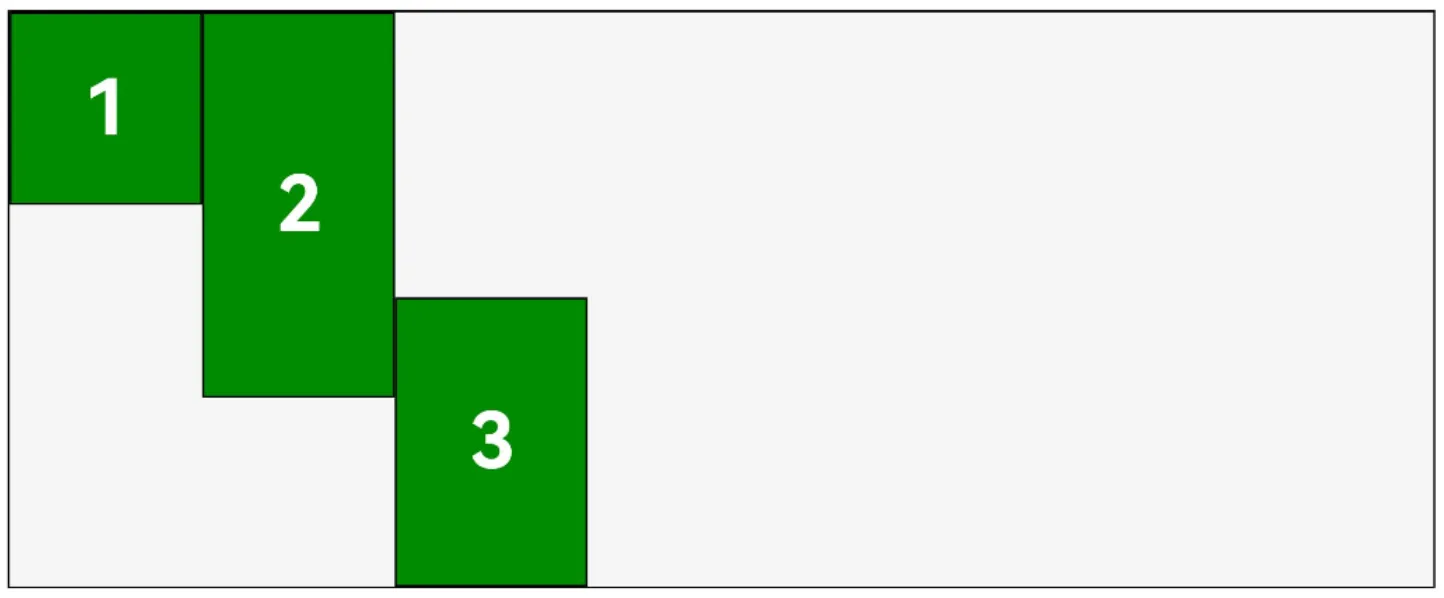
Flex容器的子组件可以使用alignSelf()方法单独设置自己的交叉轴对齐方式,并且其优先级高于Flex容器alignItems。具体效果如下
说明:
alignSelf()的参数类型和alignItems()相同,均为ItemAlign枚举类型,且各枚举值的含义也完全相同。
代码- Flex({ direction: FlexDirection.Row, alignItems: ItemAlign.Start }) {
- Text('1')
- .width(100)
- .height(100)
- .itemTextStyle()
- Text('2')
- .width(100)
- .height(200)
- .itemTextStyle()
- Text('3')
- .width(100)
- .height(150)
- .itemTextStyle()
- .alignSelf(ItemAlign.End) //单独设置交叉轴对齐方式
- }.height(300)
- .width('95%')
- .flexStyle()

示例代码
pages/component/layout/flex目录,新建AlignSelfPage.ets文件- @Entry
- @Component
- struct AlignSelfPage {
- build() {
- Column({ space: 50 }) {
- Flex({
- direction: FlexDirection.Row,
- alignItems: ItemAlign.Start
- }) {
- Text('1')
- .width(100)
- .height(100)
- .itemTextStyle9()
- Text('2')
- .width(100)
- .height(200)
- .itemTextStyle9()
- Text('3')
- .width(100)
- .height(150)
- .itemTextStyle9()
- .alignSelf(ItemAlign.End)
- }.height(350)
- .width(350)
- .flexStyle9()
- }.width('100%')
- .height('100%')
- .justifyContent(FlexAlign.Center)
- }
- }
- @Extend(Text) function itemTextStyle9() {
- .textAlign(TextAlign.Center)
- .fontColor(Color.White)
- .fontSize(40)
- .fontWeight(FontWeight.Bold)
- .backgroundColor('#008a00')
- .borderWidth(1)
- }
- @Extend(Flex) function flexStyle9() {
- .backgroundColor('#f5f5f5')
- .borderWidth(1)
- }
弹性布局的显著特点之一是子组件沿主轴方向的尺寸具有弹性,即子组件的大小能够随着Flex容器尺寸的变化而自动伸缩。这种弹性特性使得Flex布局能够使子组件更灵活地适应不同的屏幕尺寸和设备。和自适应伸缩的相关的属性有flexShrink、flexGrow和flexBasis,下面逐一介绍
3.2.1 flexShrink 压缩
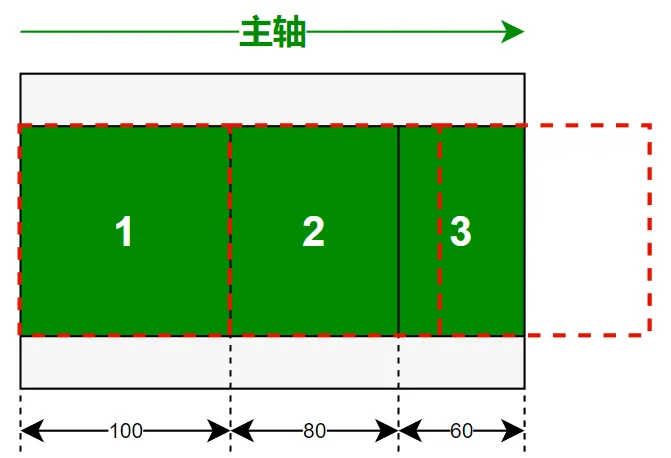
flexShrink用于设置父容器空间不足时,子组件的压缩比例,尺寸的具体计算逻辑如下
代码- //Flex容器主轴尺寸为240,子组件主轴尺寸之和为100*3=300
- Flex() {
- //尺寸=100
- Text('1')
- .width(100)
- .height(100)
- .flexShrink(0) //不压缩
- //主轴尺寸=100-(300-240)*(1/3)=80
- Text('2')
- .width(100)
- .height(100)
- .flexShrink(1) //压缩比例为1
- //主轴尺寸=100-(300-240)*(2/3)=60
- Text('3')
- .width(100)
- .height(100)
- .flexShrink(2) //压缩比例为2
-
- }.height(150)
- .width(240)

示例代码
pages/component/layout/flex目录,新建FlexShrinkPage.ets文件- @Entry
- @Component
- struct FlexShrinkPage {
- build() {
- Column({ space: 50 }) {
- Flex({
- direction: FlexDirection.Row,
- alignItems: ItemAlign.Center
- }) {
- //尺寸=100
- Text('1')
- .width(100)
- .height(100)
- .itemTextStyle10()
- .flexShrink(0) //不压缩
- //主轴尺寸=100-(300-240)*(1/3)=80
- Text('2')
- .width(100)
- .height(100)
- .itemTextStyle10()
- .flexShrink(1) //压缩比例为1
- //主轴尺寸=100-(300-240)*(2/3)=60
- Text('3')
- .width(100)
- .height(100)
- .itemTextStyle10()
- .flexShrink(2) //压缩比例为2
- }.height(150)
- .width(240)
- .flexStyle10()
- }.width('100%')
- .height('100%')
- .justifyContent(FlexAlign.Center)
- }
- }
- @Extend(Text) function itemTextStyle10() {
- .textAlign(TextAlign.Center)
- .fontColor(Color.White)
- .fontSize(40)
- .fontWeight(FontWeight.Bold)
- .backgroundColor('#008a00')
- .borderWidth(1)
- }
- @Extend(Flex) function flexStyle10() {
- .backgroundColor('#f5f5f5')
- .borderWidth(1)
- }
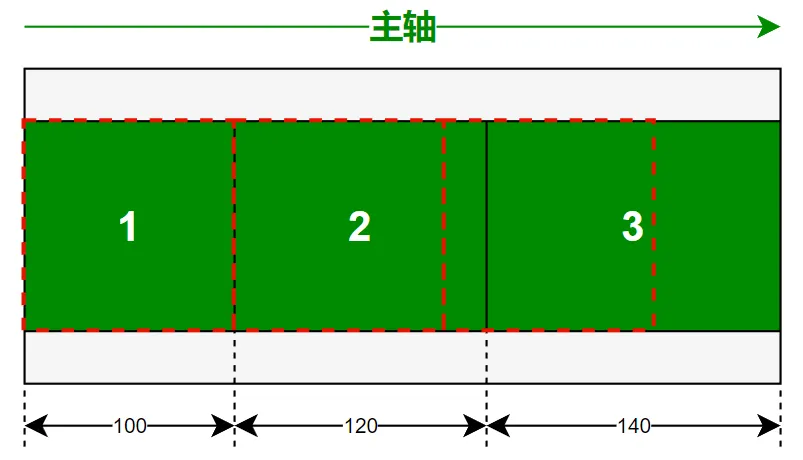
flexGrow用于设置父容器空间充足时,组件瓜分剩余空间的比例,尺寸的具体计算逻辑如下
代码- Flex() {
- //尺寸=100
- Text('1')
- .width(100)
- .height(100)
- .flexGrow(0) //不拉伸
- //主轴尺寸=100+(360-300)*(1/3)=120
- Text('2')
- .width(100)
- .height(100)
- .flexGrow(1) //拉伸比例为1
- //主轴尺寸=100+(360-300)*(2/3)=140
- Text('3')
- .width(100)
- .height(100)
- .flexGrow(2) //拉伸比例为2
- }.height(150)
- .width(360)

示例代码
pages/component/layout/flex目录,新建FlexGrowPage.ets文件- @Entry
- @Component
- struct FlexGrowPage {
- build() {
- Column({ space: 50 }) {
- Flex({
- direction: FlexDirection.Row,
- alignItems: ItemAlign.Center
- }) {
- //尺寸=100
- Text('1')
- .width(100)
- .height(100)
- .itemTextStyle11()
- .flexGrow(0) //不拉伸
- //主轴尺寸=100+(360-300)*(1/3)=120
- Text('2')
- .width(100)
- .height(100)
- .itemTextStyle11()
- .flexGrow(1) //拉伸比例为1
- //主轴尺寸=100+(360-300)*(2/3)=140
- Text('3')
- .width(100)
- .height(100)
- .itemTextStyle11()
- .flexGrow(2) //拉伸比例为2
- }.height(150)
- .width(360)
- .flexStyle11()
- }.width('100%')
- .height('100%')
- .justifyContent(FlexAlign.Center)
- }
- }
- @Extend(Text) function itemTextStyle11() {
- .textAlign(TextAlign.Center)
- .fontColor(Color.White)
- .fontSize(40)
- .fontWeight(FontWeight.Bold)
- .backgroundColor('#008a00')
- .borderWidth(1)
- }
- @Extend(Flex) function flexStyle11() {
- .backgroundColor('#f5f5f5')
- .borderWidth(1)
- }
flexBasis用于设置子组件沿主轴方向的尺寸,相当于width或者height的作用。若设置了flexBasis,则以flexBasis为准,否则以widht或者height为准。
《鸿蒙应用开发从入门到项目实战》系列文章持续更新中,陆续更新AI+编程、企业级项目实战等原创内容,防止迷路,欢迎关注!
来源:程序园用户自行投稿发布,如果侵权,请联系站长删除
免责声明:如果侵犯了您的权益,请联系站长,我们会及时删除侵权内容,谢谢合作! |